Yarn Over And Draw Up A Loop
If you crochet, the humble yarn over (YO, or 'yarn over hook', YOH, in UK terminology) is a vital part of every single crochet stitch. But are you doing it correctly? There's actually a right and a wrong way to wrap the yarn over your hook in crochet, and it's such a basic move that you may have been doing it wrongly for years without realising!
Let's look at the difference:
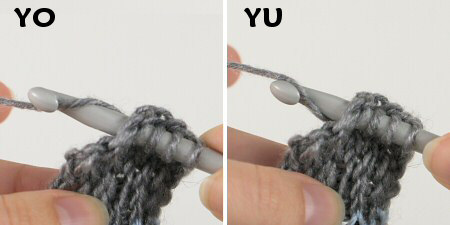
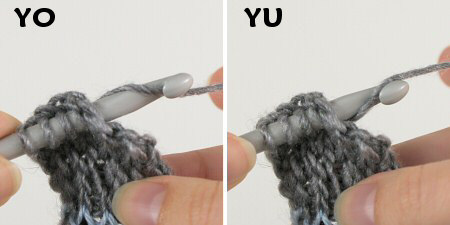
- With a normal crochet YO, you place the hook underneath the yarn strand and then hook the yarn from below.
- With a yarn under (YU), you put the hook over the yarn strand and then hook the yarn from above.
Here's how they look, if you're right-handed:
And if you're left-handed:
I think the confusion may lie in the name yarn over. In crochet, you don't really wrap the yarn over your hook at all: you use the hook to catch the yarn, so the phrase "yarn over (hook)" would be more accurately named "hook under (yarn)"…
I've put together a video to help clarify this – the first in my new Crochet Quickies series of short (around 1 minute) videos to explain very basic or brief crochet techniques. (I'll still be making longer videos too, for techniques that would benefit from a little more explanation.)
Crochet Quickie: Yarn Over (right-handed)
Click to watch this video on YouTube.
Crochet Quickie: Yarn Over (left-handed)
Click to watch this video on YouTube.
Note: The videos may look a little small embedded in the blog: if so, you can fullscreen them or click through to YouTube to watch them in full HD resolution 🙂
If you are crocheting – and this applies to all standard and Tunisian crochet stitches – passing the yarn over the hook is always the correct way to do a YO.
If you're not sure which way you do it, grab some yarn and a hook. Pause when you've hooked a loop of yarn, just before you draw it up through the stitch, and see which way the yarn lies across your hook, using the photos or videos above for reference – you may discover you've been crocheting incorrectly! To try to tell if you're doing it right in future, remember it's called yarn over, so the yarn goes over the hook, i.e. the hook should pass under the yarn before you hook the yarn.
Exception
Now here's the exception, and one I've experienced first-hand: this does not necessarily apply for knooking (knitting with a special crochet hook – see my review of The Knook for more information). With knooking, the way that you position the yarn across your hook varies depending on whether you're knitting or purling. When I first tried knooking, I used a standard YO for all my stitches and they ended up twisted. Why this difference? Because knooking, despite using a crochet hook, is not crochet, it's knitting with an unusual technique.
There may be other exceptions that require you to wrap the yarn in a different way, but the stitch instructions should always inform you if that's the case. If all you see is "yarn over" or "YO", the standard way is the correct way.
Does it really matter?
Yes and no! The difference is more visible with some crochet stitches than with others. For knooking and Tunisian knit stitch, it's extremely important to use the intended YO/YU. For other crochet stitches, there is a difference in the finished appearance, but it may be much less obvious.
Simone from my Ravelry group worked up a test swatch in rows of sc, which shows a clear difference between the rows of YO and the rows of YU:
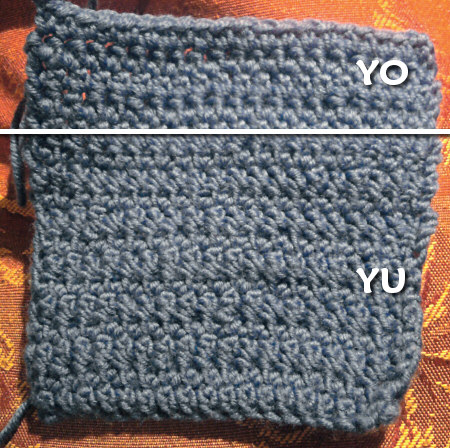
Rows of YO and YU (swatch and photo by Simone, used with permission)
You can see that there's a definite slant/twist to the YU stitches compared with the YO stitches, and each YO stitch is more clearly defined – the YU stitches seem to blend more into a flatter finished surface. They both look attractive, but they are clearly not the same.
YU in amigurumi
I thought it'd be interesting to see what, if any, difference you'd see if you worked amigurumi (single crochet, worked in the round without turning) with YU, so I made two small amigurumi balls, worked identically except for the YOs or YUs throughout.
Almost immediately, I noticed something unexpected: a flat circle is actually flatter when worked in YU! Normally, the backs of all the stitches are larger than the fronts (because we aren't turning the work between rounds), which makes a flat circle want to curl up slightly into a bowl shape, with the right side on the inside of the bowl. You can see that slight curling at the edge of my YO sample, but it's missing from the YU sample! Very interesting…
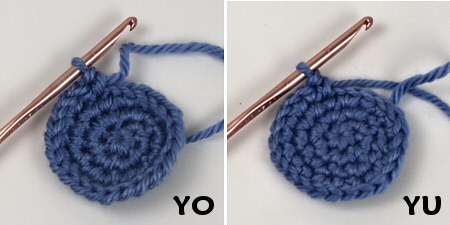
Left: YO edges are curved up (the 'v's around the edge face upwards)
Right: YU edges are perfectly flat (the 'v's around the edge face outwards)
I found YO and YU equally easy to work, although of course I had to concentrate on every stitch with the YU sample to make sure I didn't slip back into my usual automatic YO method. And now let's look at the finished samples:
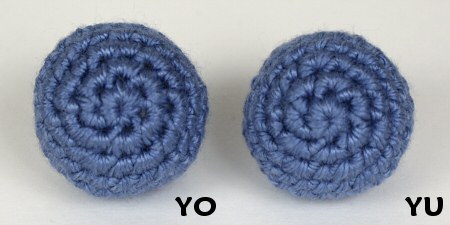
From the top (magic ring visible)
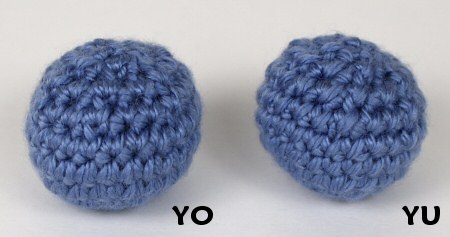
From the side (there are 2 rounds with no increases/decreases around the middle of each ball)
- YO has more obvious texture, whereas YU is flatter. The twisting of the YU stitches seems to actually fill the gaps between the stitches better and each stitch is less clearly defined.
- The twisting of the stitches is very subtle, but I can definitely see a diagonal slant visible within each YU stitch. The slant is more pronounced on the decreases – invisible decreases aren't so invisible if you YU!
- My YU sample is noticeably smaller. Although this could be a tension issue because of the unfamiliar YU hand movements, it could also contribute to the smaller gaps between stitches.
If your amigurumi stitches don't look like other people's, and you're definitely not working inside out, this could be the reason!
Conclusion
The difference between YO and YU if you're making amigurumi is slight, but it is noticeable if you're looking for it. The difference can be more apparent with crochet stitches other than single crochet.
If you've just discovered that you've always worked in YU, I don't think you necessarily need to change if you're happy with the way you've been working. There's no law that says you have to crochet in the same way as everyone else. You're free to crochet in a non-standard fashion (unless you're teaching crochet, or creating patterns, tutorials, or crocheted samples for patterns/books) – if you like the finished result, that's all that matters.
I can confirm (from trying it in reverse) that it's not easy to make the change, and you'll probably need at least a few hours of heavy concentration before the different hand movements become natural, or maybe longer if you've been crocheting for many years. I would advise that you at least try working a small piece in YO, to try it out, and see how it feels and how the finished piece looks – you may find that you prefer it.
Whichever method you choose, the most important thing is to be consistent, and not switch between the two methods. It'll only look like you've made a mistake if you suddenly switch from one to the other within a piece, which will make some of your stitches look different from others. But if you'd like your stitches to look like everyone else's, YO is the way to go!
Do you find my tutorials helpful? If so, please consider making a contribution towards my time so I can continue to create clear and concise tutorials for you:
Thank you so much for your support! Now click below for loads more crochet video and photo tutorials (and do let me know what else you'd like me to cover in future tutorials…)

Yarn Over And Draw Up A Loop
Source: https://www.planetjune.com/blog/yarn-over-vs-yarn-under-in-crochet/
Posted by: davisbrounally.blogspot.com

0 Response to "Yarn Over And Draw Up A Loop"
Post a Comment